QuickBooks first sync walkthrough
You've connected to QuickBooks (per QuickBooks prerequisites). Now you need to tell Suprata how to translate its concepts (Accounts, Items, Invoices, Payments, Business Units) into QB's concepts (Customers, Items, Invoices, Payments, Classes, Accounts).
That translation is what the QuickBooks Setup Wizard does. This article walks through the wizard step by step, then covers what to verify after the first sync run.
Before you start the wizard
Make sure:
- The connection banner on the QuickBooks Settings page is green ("Connected").
- You're prepared to make decisions about which QB accounts represent which financial concepts. If you're not confident, get your bookkeeper on a call before continuing — these choices are hard to undo cleanly.
- Your historical cutoff date is set the way you want it (the wizard doesn't expose this; it's on the Settings screen).
- Sync is OFF. The "Enable QuickBooks Sync" toggle should be off until you've finished the wizard. Otherwise the system may start pushing data with incomplete mappings.
Opening the wizard
From the QuickBooks Settings page, find the Setup Wizard link (often in the breadcrumbs or as an action button).
The wizard has four steps shown as tabs at the top: 1. Accounts, 2. Classes, 3. Payment Methods, 4. Sync Settings. Walk through them in order; each step's Save & Continue advances to the next.
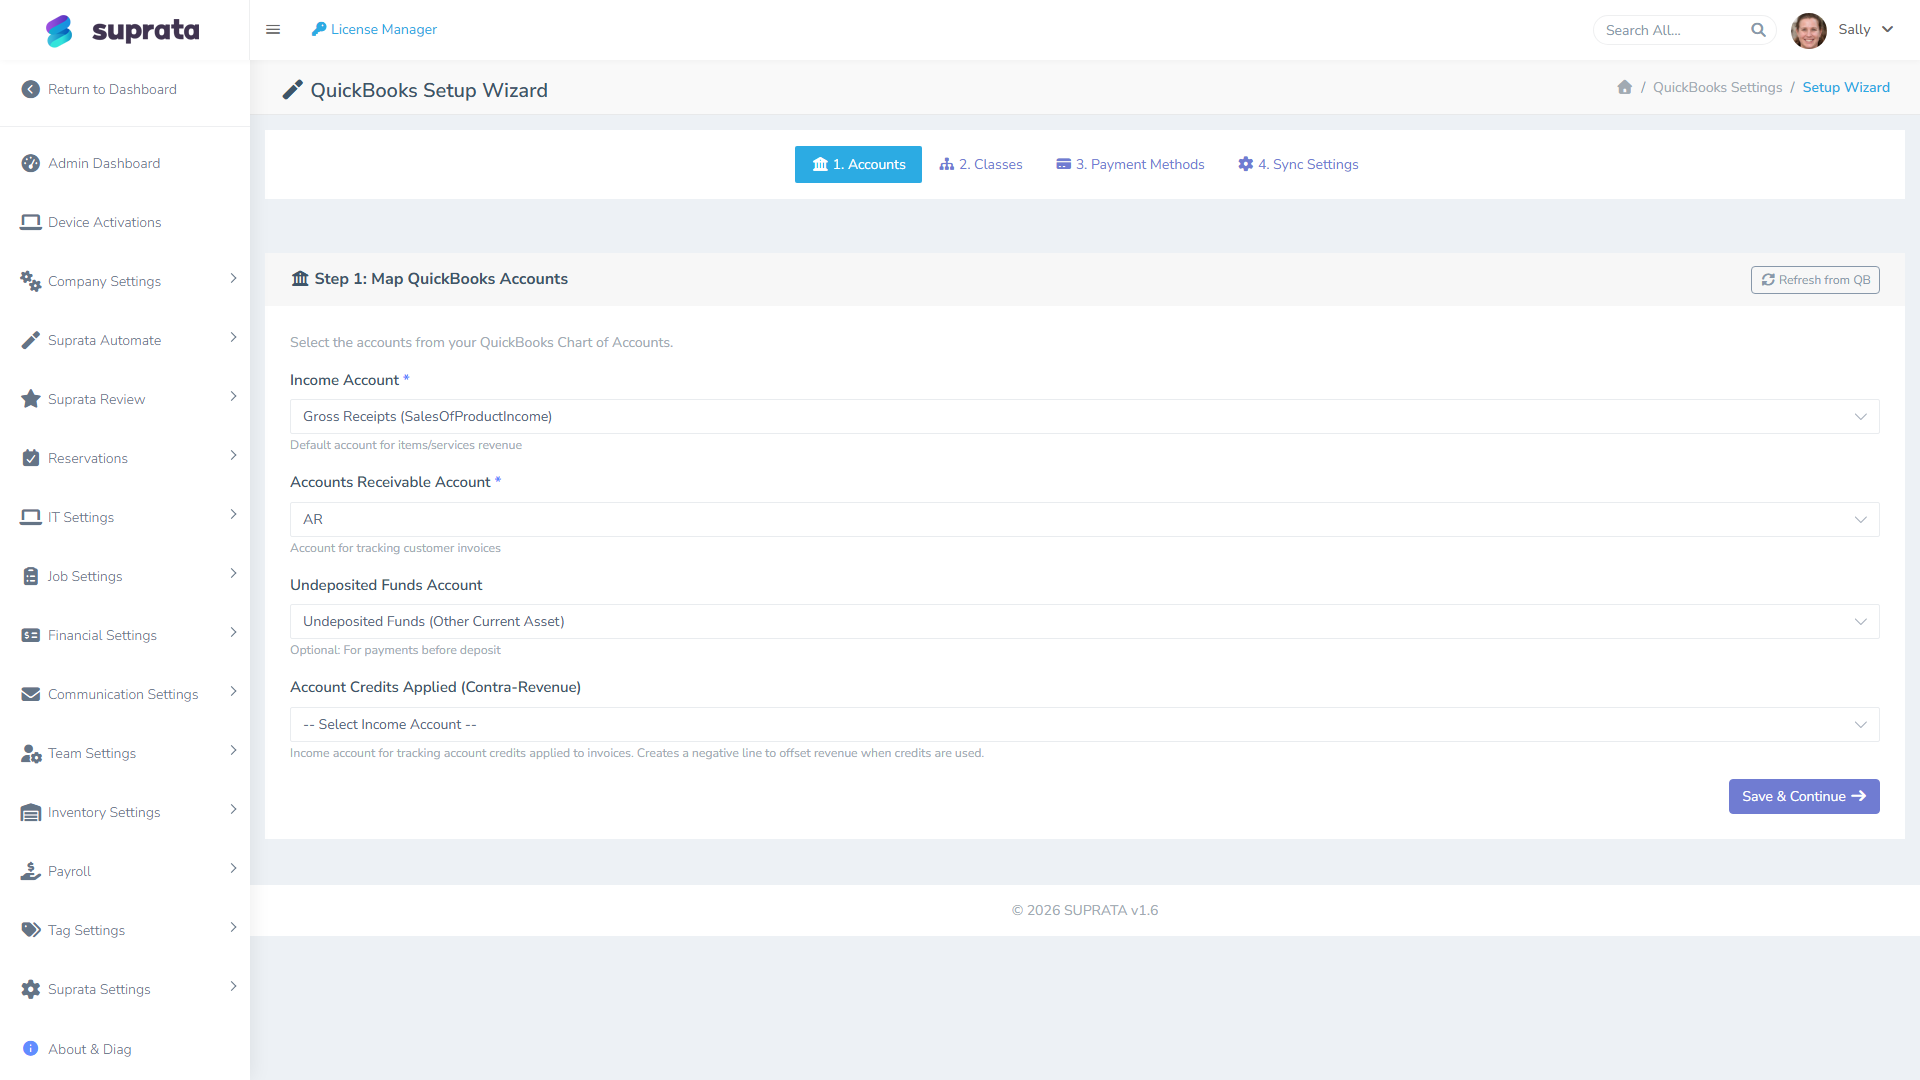
Step 1 — Map QuickBooks Accounts
This step tells QB which accounts to credit and debit when invoices and payments come in from Suprata.
Income Account
The QB account that gets credited when an invoice is created. Almost always something like "Sales", "Gross Receipts", "Service Revenue", or a similar Income-type account in your QB chart of accounts.
If you have multiple income accounts (e.g., separate ones for Service Revenue vs. Parts Revenue), this is the default — individual pricelist items can override at the QB-item level.
Recommendation: Pick the most general income account that covers your typical sales. Don't try to be clever with sub-accounts here; the per-item override is the right place for that.
Accounts Receivable Account
The QB A/R account where customer balances accrue. Usually just "Accounts Receivable" — there's typically one. If you have multiple A/R accounts (multi-entity QB setup), pick the one matching the entity Suprata represents.
Undeposited Funds Account
Optional. Used for payments captured in Suprata before they've actually been deposited to your bank. Standard QB practice is to route card payments through Undeposited Funds, then a "Deposit" transaction in QB matches them to the bank deposit.
If you don't use Undeposited Funds in QB (some businesses skip it), leave this blank — payments will book directly to the bank account associated with each payment method.
Customer Credits Applied (Contra-Revenue)
Optional. Used when you apply customer credits to reduce an invoice. The credit shows as a negative line on the invoice that needs an offsetting income (or contra-revenue) account.
If you don't issue customer credits, leave this blank. If you do, ask your bookkeeper which account to use — getting this wrong creates revenue-recognition oddities.
Click Save & Continue.
Step 2 — Map Classes (optional)
Class tracking in QB is a way to tag transactions for departmental or location-based reporting. If you use Business Units in Suprata and want them to flow through to QB Class reporting:
- Map each Suprata Business Unit to a QB Class.
- The wizard pulls QB's class list directly from QuickBooks.
If you don't use Business Units, or you don't use QB Class tracking, skip this step (leave mappings empty).
Recommendation: Don't enable Class tracking just because Suprata supports it. Class tracking adds reporting overhead in QB. Only enable if your bookkeeper specifically wants per-class P&L breakouts.
Step 3 — Map Payment Methods
This step tells QB which payment method to record when a payment comes through.
For each Suprata payment method, pick the matching QB payment method:
- Stripe → "Credit Card" (or "Visa", "MasterCard", etc., if you've set those up separately in QB).
- USIO ACH → "ACH" or "Check" (depending on how your bookkeeper categorizes ACH).
- Cash → "Cash".
- Check → "Check".
- Wire → "Wire" (if you have it; otherwise "Other").
If a Suprata method has no matching QB method, create the method in QB first, then come back and refresh the dropdown.
The mappings affect how payments show up on QB deposit reports. Wrong mappings won't break sync — they'll just put payments in the wrong "bucket" for reconciliation.
Step 4 — Sync Settings
Final step. Decide what to actually sync:
- Sync Customers — push new and updated customer records.
- Sync Items/Services — push pricelist items.
- Sync Invoices — push closed invoices.
- Sync Estimates — optional. Many businesses leave this off (estimates are not yet revenue and don't belong in QB until accepted).
- Sync Payments — push payment receipts.
- Sync Customer Credits — push credit memos.
Recommended initial settings: Customers, Items, Invoices, Payments on; Estimates and Customer Credits off until you've verified the basics work.
This is also where you set the sync interval — how often Suprata should push pending changes to QuickBooks. The default of 30 seconds is fine for most businesses. If you write a lot of invoices a day, a longer interval (a few minutes) is gentler on the QuickBooks connection. Very low volume? Leave it at the default.
Save. The wizard ends and returns you to the QuickBooks Settings page.
Turning sync on
Now flip Enable QuickBooks Sync to on.
The system will start picking up the first batch of records on its next run. Customer records typically sync first (because invoices depend on them), then items, then invoices, then payments. The system handles the dependency chain automatically — invoices wait for their customer to be synced before they push.
Reading the sync report
Sidebar: Suprata Settings → Integrations → QuickBooks Settings → View Sync Report (or the "Sync Status & Logs" panel on the Settings page).
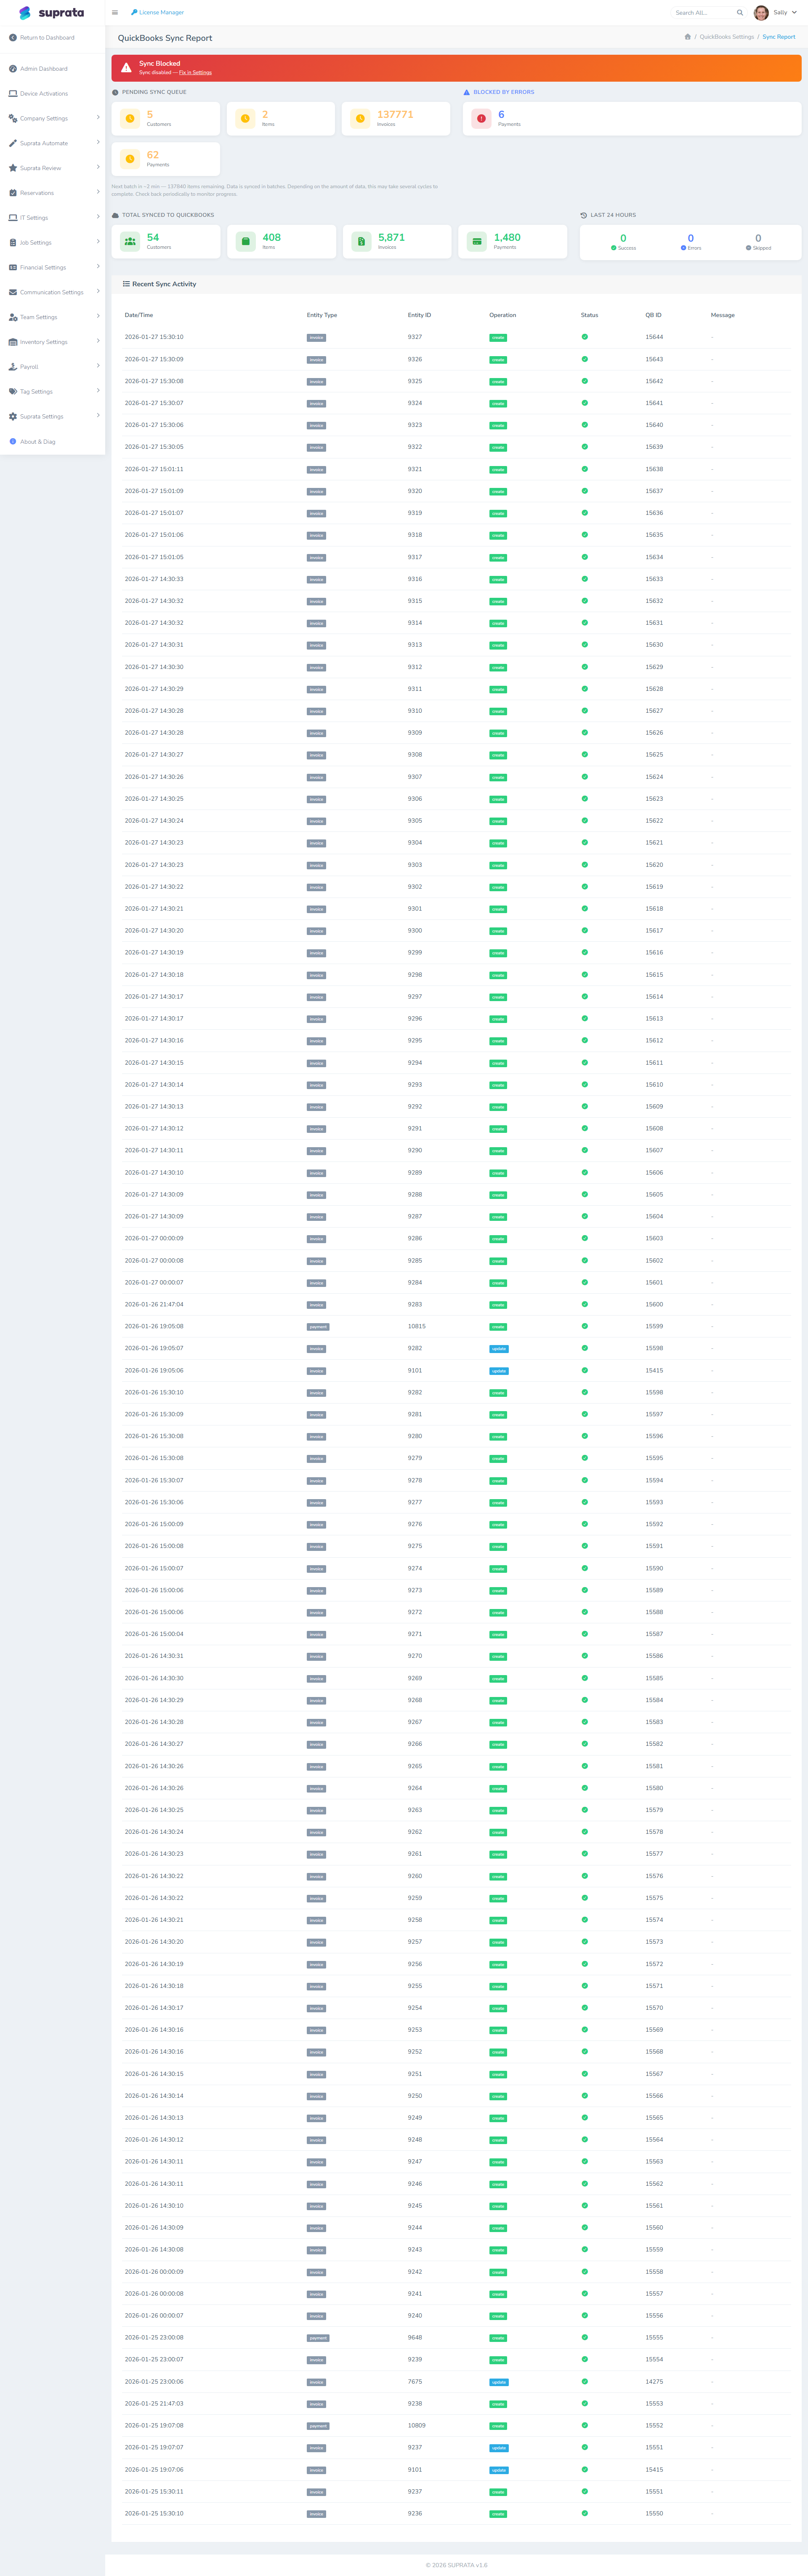
This is the per-record log of what synced, what's pending, and what failed. Each row is a Suprata entity (account, item, invoice, payment) with its current sync state.
What to look for in the first 30 minutes:
- Customer sync should complete first. Watch for green "synced" status on most customers within the first sync cycle or two.
- Item sync should follow. Your pricelist items show up in QuickBooks as Items.
- Invoice sync starts once customers and items are in place. Suprata won't push an invoice until that customer and every item on it have already synced — it waits its turn rather than push a broken record.
- Payment sync starts as soon as the matching invoice is synced.
If records sit in "pending" for a long time, it's almost always because something they depend on is stuck — usually a customer or an item that errored out, holding up everything attached to it.
Verifying the first sync ran cleanly
Before declaring victory, do these checks:
Check 1: customer counts match
In Suprata, count your active Accounts. In QB, count your Customers. They should match (within an expected delta if you set a historical cutoff date).
If QB has fewer customers than Suprata, sync isn't done yet — wait another sync cycle. If QB has more customers than Suprata, you have duplicates — go back to prerequisites and clean up.
Check 2: item counts match
Same exercise for pricelist items vs. QB items.
Check 3: spot-check three invoices
Pick three invoices from the past week (one large, one small, one with a credit applied). For each:
- Find the matching invoice in QB.
- Verify the total matches.
- Verify the customer matches.
- Verify the line items and tax breakdown match.
- Verify the date matches.
If all three reconcile, you're in good shape. If any don't, drill into the sync log for that specific invoice.
Check 4: payment booking
For one synced payment, verify it booked to the correct deposit account in QB (Undeposited Funds, or your bank account, depending on your mapping).
When the first sync goes wrong
The most common first-sync issues:
- Item name collisions. Suprata has an item "Service Call" and QB also has "Service Call" but with a different description. Result: sync error or a
(2)duplicate. Fix: rename one of them, then reset the failed sync. - Customer with no email or address. Some QB account configurations require email; the customer fails to sync; all their invoices wait. Fix: complete the customer record in Suprata, sync retries automatically.
- Tax category not mapped. If your invoices use a tax category that doesn't have a corresponding QB tax code, sync errors. Fix: map the category, or for the first sync, simplify by using one default tax category until QB-side tax codes are sorted.
- Closed period in QB. If you're syncing historical invoices to dates that fall in a QB-closed accounting period, sync errors. Fix: re-open the period in QB temporarily, sync, re-close.
- Currency mismatch. Multi-currency QB accounts can have customers in different currencies than your default. If Suprata pushes USD invoices to a CAD customer, sync errors. Fix: align currencies before sync.
Ongoing operations after first sync
Once the first sync is clean, the system runs in the background:
- New invoices push when they're closed in Suprata.
- Edits to synced records re-push (within reason — heavily-edited synced invoices may need manual reconciliation).
- New customers sync when they're created.
- New items sync when added to the pricelist.
You don't have to think about it. The exception monitoring (sync errors, prerequisite gaps) is what to actually keep an eye on — review the sync report weekly to catch issues before your bookkeeper does.
Common mistakes during the wizard
- Mapping accounts you'll regret. "Just pick something" is bad advice for the income and A/R mappings. They're foundational. Take the extra ten minutes to get them right.
- Enabling all sync toggles on day one. Start narrow (Customers + Items + Invoices + Payments). Add Estimates and Credits after the basics are solid.
- Setting sync interval to 1 second. It feels nice for the "real-time" promise, but QuickBooks rejects connections that hit it too often. Stick with 30 seconds to a few minutes.
- Skipping the verification checks. "It seems to be working" is not the same as "the customer and item counts match and three invoices reconcile". Do the checks.
- Ignoring the sync report after setup. First-week issues compound silently. A 5-minute weekly review catches most problems before they become reconciliation nightmares.
Related articles
- QuickBooks prerequisites
- Sending an invoice to a customer
- Connecting Stripe
- Reading the QuickBooks sync report (forthcoming)
- QuickBooks tax-code mapping (forthcoming)